The Overview:
We need to create an outdoor classroom that people can use to learn, play, read, study, etc., within the limitations provided not only by permits and legal issues of the state but also by our own challenges, which includes no electricity and a budget of $5000. Important aspects that we needed to know in order to actually complete this room included the structure and behaviors of atoms and molecules, as well as solar angles and how they change during the seasons, and also methods of heat transfer. This concept manifested itself in one of my favorite labs until now, the Solar Water Heater Lab, which mainly focused on radiation, conduction, and insulation, and also provided us with ways to heat the water in our room efficiently with solar energy.
Atomic structure, state, and heat:
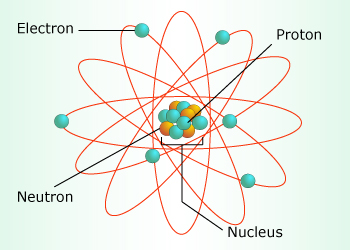
This was initially one of the most confusing aspect of not only this project, but this entire class. We began by learning about the actual structure of the atoms, and how the number of protons and neutrons were equally represented in the nucleus, and how the number of electrons would determine if an atom was ionized or not. But when it came to learning the mechanics of an electron, that was when things got exceptionally mind-boggling, and we were introduced to the quantum leap, the idea that an electron can exist virtually everywhere and nowhere at the same time within a certain area in a shape similar to a cloud, amorphous and within no definite boundaries. We also learned that the physical state of the atom is dependent on the movement and subsequent thermal energy of the atom, and the faster an atom moves, it has more energy to break free of the bonds between other molecules, which causes it to change state. When an atom is coldest, and has very little energy to break its bonds, it is in a solid state, but when it heats up and gains enough energy to loosen the bonds, the molecules can move in a less restricted manner, and it is in a liquid form. In its third state, the molecules have enough thermal energy to completely free itself, and they are not bound to others, thereby maintaining a gaseous form. Finally, we learned how the molecule's movement is related to the heat, with molecules that are moving faster generating more thermal energy and heat, and molecules that are moving more slowly generating less thermal energy and heat. We also learned that if we increased the heat of an object, perhaps a balloon, the pressure and density of that object would decrease, while the volume would increase, and vice versa if we were to cool the object.
We need to create an outdoor classroom that people can use to learn, play, read, study, etc., within the limitations provided not only by permits and legal issues of the state but also by our own challenges, which includes no electricity and a budget of $5000. Important aspects that we needed to know in order to actually complete this room included the structure and behaviors of atoms and molecules, as well as solar angles and how they change during the seasons, and also methods of heat transfer. This concept manifested itself in one of my favorite labs until now, the Solar Water Heater Lab, which mainly focused on radiation, conduction, and insulation, and also provided us with ways to heat the water in our room efficiently with solar energy.
Atomic structure, state, and heat:
This was initially one of the most confusing aspect of not only this project, but this entire class. We began by learning about the actual structure of the atoms, and how the number of protons and neutrons were equally represented in the nucleus, and how the number of electrons would determine if an atom was ionized or not. But when it came to learning the mechanics of an electron, that was when things got exceptionally mind-boggling, and we were introduced to the quantum leap, the idea that an electron can exist virtually everywhere and nowhere at the same time within a certain area in a shape similar to a cloud, amorphous and within no definite boundaries. We also learned that the physical state of the atom is dependent on the movement and subsequent thermal energy of the atom, and the faster an atom moves, it has more energy to break free of the bonds between other molecules, which causes it to change state. When an atom is coldest, and has very little energy to break its bonds, it is in a solid state, but when it heats up and gains enough energy to loosen the bonds, the molecules can move in a less restricted manner, and it is in a liquid form. In its third state, the molecules have enough thermal energy to completely free itself, and they are not bound to others, thereby maintaining a gaseous form. Finally, we learned how the molecule's movement is related to the heat, with molecules that are moving faster generating more thermal energy and heat, and molecules that are moving more slowly generating less thermal energy and heat. We also learned that if we increased the heat of an object, perhaps a balloon, the pressure and density of that object would decrease, while the volume would increase, and vice versa if we were to cool the object.
|

|
|
Solar Angles:
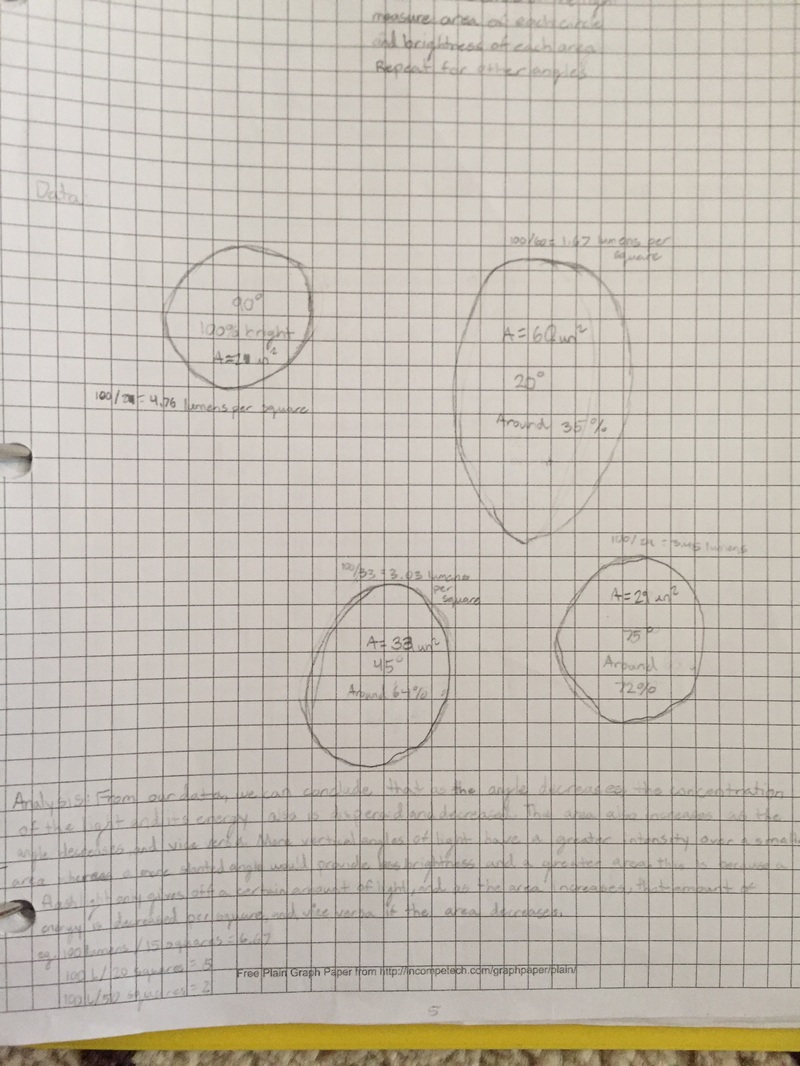
This aspect of our project was much simpler compared to the atomic structure, but it was no less important than the atomic structure, if not any more significant than that portion. We learned how the tilt of the axis of the Earth would result in either the Northern or Southern hemisphere being angled towards the Sun, and when they were tilted towards the Sun, it would be considered to be summer in that region. This could be explained through the simple concept regarding the fact that when the sunlight is impacting an area directly, it radiates more solar energy there than it does if hits a location indirectly, or at an angle, which is what happens during the autumn and spring seasons. To confirm this information, we conducted a small lab in which we shone a flashlight on a piece of paper at different angles from the same height, and we would measure the area over which the light was cast. From there, we used mathematical equations to figure out the concentration of light as compared to the initial, 90 degree light, and we came to this realization. Each source of light gives off a certain amount of light, which can be measured in lumens. Afterwards, Mr. Williams showed us a chart that effectively showed us at what angle the sun's rays would strike our location, and when we were planning the location of our outdoor classroom and measuring the dimensions of our shade structure, the solar angles were one of the most important things that we had to take into account. |
|
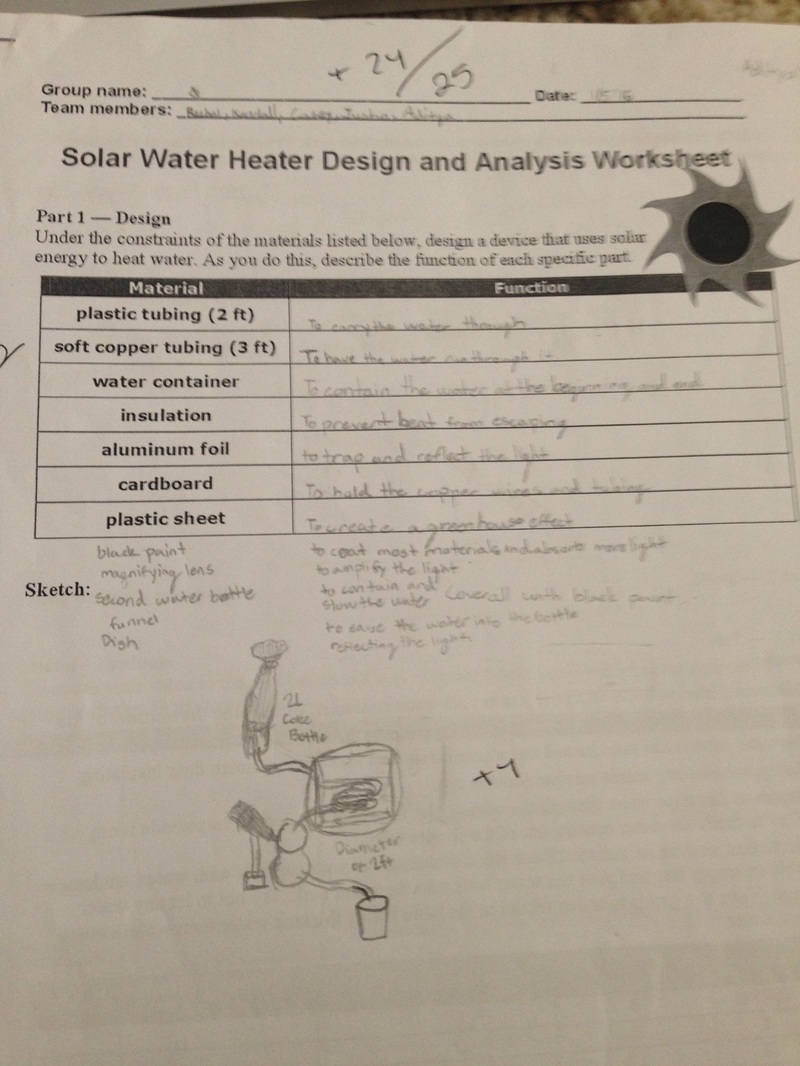
Solar Water Heater Lab:
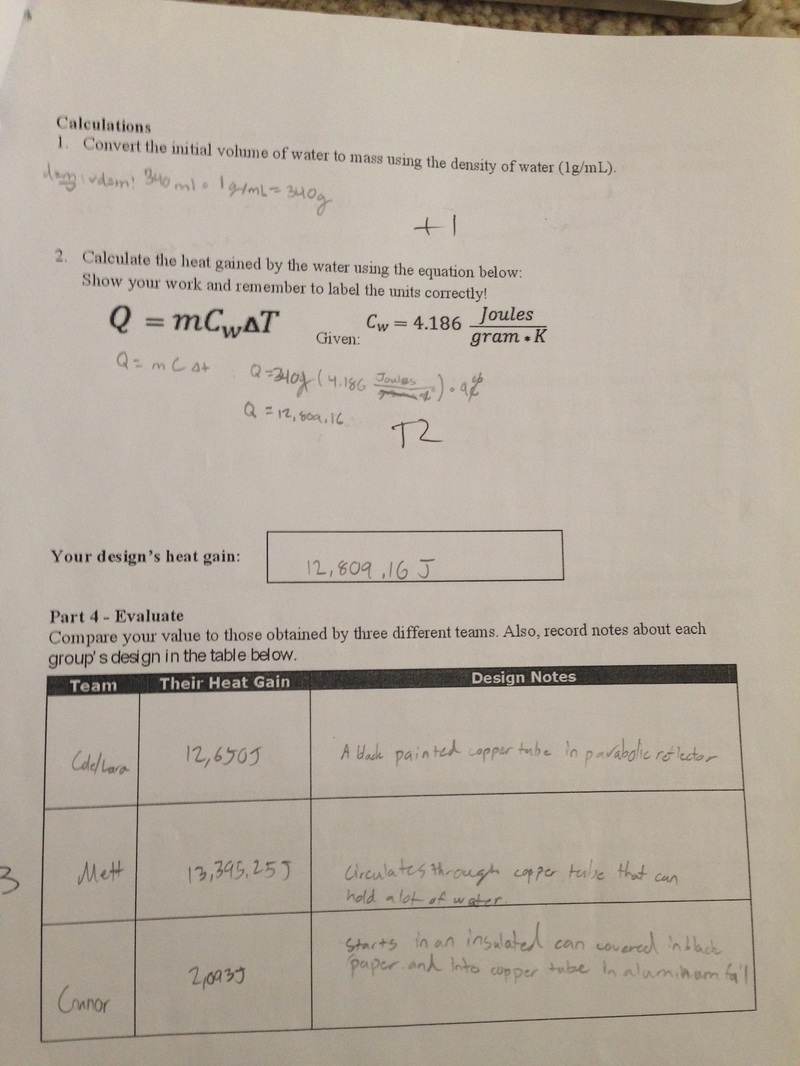
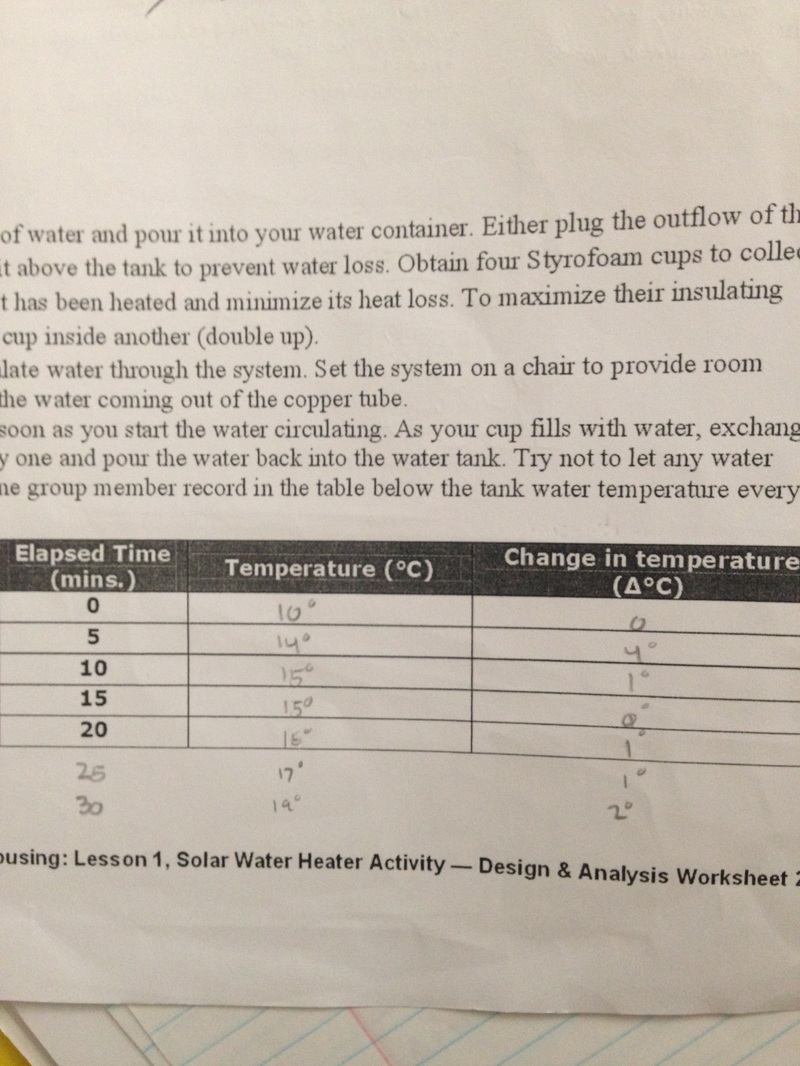
This lab was not meant to show us how to design a water heater for our classroom, but rather, it was meant to show us how we can effectively heat up certain objects (such as... a classroom?) only using the energy of the sun, and a few additional other tools to amplify the strength of the light. The first thing that we did in this lab was design a box where the strength of the sun would be the strongest, and cover that with plastic to give it a greenhouse effect, and make a tube of either copper of differing widths or plastic to let the water run through the system. Next, we thought of ways to insulate our container which all the water would ultimately end up in, and magic towels along with ripped up cotton balls were the best option, and we also decided that we wanted to have a way of reflecting most, if not all of the light, towards our copper container. To achieve this, we lined the entire heater with mirrors that Rachel brought from Dollar Tree, made a parabolic reflector that our container would be suspended over, so that all of the light could be reflected at the focus of the parabola, and for good measure, we put a large mirror behind our water heater. The unique component of our water heater design was the fact that we used magnifying glasses to focus the light on certain points of our container, and that resulted in us heating up about 340 ml of water by 9 degrees Celsius.
This lab was not meant to show us how to design a water heater for our classroom, but rather, it was meant to show us how we can effectively heat up certain objects (such as... a classroom?) only using the energy of the sun, and a few additional other tools to amplify the strength of the light. The first thing that we did in this lab was design a box where the strength of the sun would be the strongest, and cover that with plastic to give it a greenhouse effect, and make a tube of either copper of differing widths or plastic to let the water run through the system. Next, we thought of ways to insulate our container which all the water would ultimately end up in, and magic towels along with ripped up cotton balls were the best option, and we also decided that we wanted to have a way of reflecting most, if not all of the light, towards our copper container. To achieve this, we lined the entire heater with mirrors that Rachel brought from Dollar Tree, made a parabolic reflector that our container would be suspended over, so that all of the light could be reflected at the focus of the parabola, and for good measure, we put a large mirror behind our water heater. The unique component of our water heater design was the fact that we used magnifying glasses to focus the light on certain points of our container, and that resulted in us heating up about 340 ml of water by 9 degrees Celsius.
|
|
|
Outdoor Classroom Design:
Part One: Survey- For the beginning of our classroom design, we had to design a survey for students and teachers to take so we, as a class, would know what our clients would need in our outdoor classroom to make the experience as enjoyable as possible. We had a process in which each table group would come up with one or two questions about a certain topic, whether it was what people wanted to study in the classroom, or what sort of teaching aids that the teacher would want in their classroom, and even what style of seating the students wanted in the classroom. After this, we had compiled the questions from our class and some from 6°/7°, made the survey on a Google Doc, and within the next few days, most students had taken the survey in their 4° class. Here is the survey and the results.
Part One: Survey- For the beginning of our classroom design, we had to design a survey for students and teachers to take so we, as a class, would know what our clients would need in our outdoor classroom to make the experience as enjoyable as possible. We had a process in which each table group would come up with one or two questions about a certain topic, whether it was what people wanted to study in the classroom, or what sort of teaching aids that the teacher would want in their classroom, and even what style of seating the students wanted in the classroom. After this, we had compiled the questions from our class and some from 6°/7°, made the survey on a Google Doc, and within the next few days, most students had taken the survey in their 4° class. Here is the survey and the results.
|
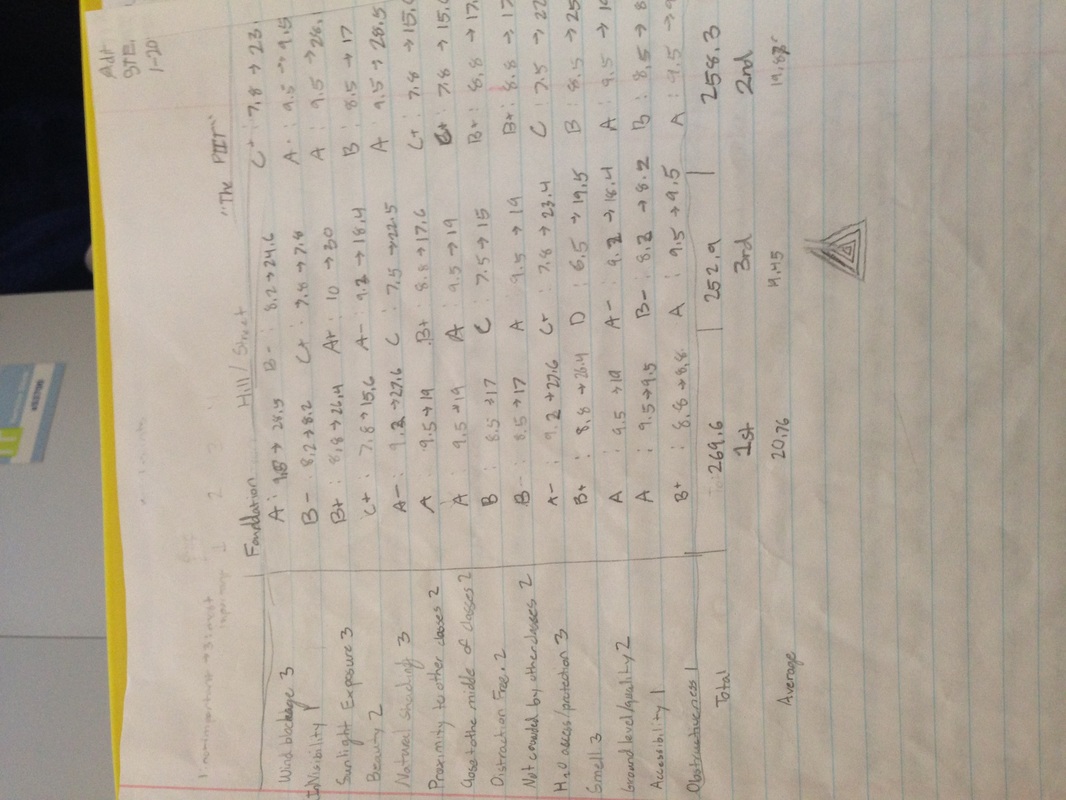
Part Two: Site Selection- For the next step, we had to find a location that would suit our purposes for the outdoor classroom. Each group had their own qualities that they wanted to find in a certain location, and for our group, the most important qualities were natural beauty, sunlight exposure, shade, water protection, proximity to other classes, and background distractions or noise. After spending a few days walking around the campus, taking measurements and checking wind speeds, we finally narrowed our search down to three viable locations: The Foundation, The Hill, and The Pit. Each of them had their own special features, but we ultimately decided on building our classroom at the foundation because of how close it was to the cafeteria, how it received natural shading, and the fact that our base was already built. On the left is a scoring sheet we made for the three locations.
|
|
Part Three: Materials Testing- During this phase, we decided to create and conduct a lab in which we would subject certain materials to heating by a heat lamp that you would find in terrariums, and put other materials under water and see how well or badly the material would retain the water. For the heating aspect of the lab, we would take mainly our seating and building materials, keep them under the heat lamp for ten minutes and record the temperature every two minutes with an infrared thermometer, and once the heating was complete, we would let the material cool down for ten minutes, taking the temperature every two minutes, or until it stopped cooling. As for the water testing, we had to pour water on the materials at 45° and 90° angles, but not before we took the mass of those objects using a triple beam balance or a spring scale. After we soaked them, we would record the mass of the object every two minutes, and also conduct a "feel test" to see how wet or damp the material still was, and we would repeat that again, until it was completely dry or we just decided that it was taking too long to dry off. Links to the lab results: tinyurl.com/stemheattest and tinyurl.com/stemwatertest
Part Four: Planning and Presenting- After all of this, we had begun planning our actual outdoor classroom using all of the information we had gained from our previous labs, activities, and steps 1-3 above, and it was not as hard as we had expected, but it still posed some challenges for us. The first thing we did was plan what we wanted our classroom seating to look like, meaning what the tables were going to be made out of, should we make the seats actual chairs or keep them as stumps, and whether we should keep our tables in one place or not, and then to make blueprints of the tables and the seating orientation,. We ultimately decided on making our tables almost exactly like the ones we have at school, but with a plexiglass top instead of the material that we currently use, because the school's tables had too much weight for us to move them around. We found a way for us to get the stumps from TreeMasters, and Kendal managed to acquire green and gold paint for us to cover the tops of our seats in, for school spirit, and the best part was that all 32 of the stumps came without any fees for us to worry about. After we had managed the group-style layout of the tables and the stumps, we focused our attention more onto how we were going to deal with the solar angles, what trees would make our outdoor classroom aesthetically pleasing and serve the function of making a privacy screen, and what sort of shade structure we would want to use. Through a lot of consultation and hard work, we found out what sort of privacy trees that we wanted, we made blueprints showing how far apart they would be placed, and we also came up with our initial idea on how to make our shade structure. This component of the outdoor classroom was much harder than everything else, and it ultimately took us around two weeks to finalize our four-tarp, retractable shade structure with a pulley system, and I think that this idea was the fourth one we had for our shade structure. Up next was figuring out the minor features, such as the whiteboard, which we ended up planning to get from Staples, and the material and amount of ground covering that we would need to cover our classroom floor, as well as the amount of concrete we would need to hold the posts of our shade structure. Our penultimate step in planning this out was creating our materials list, which contained everything from the price per unit of each material, how much of it we were planning on getting, and what website we found the materials on. Here is the link to our materials list: http://tinyurl.com/StemMaterialsList. With all of our schematics sketched, and our ideas finalized, we spent the last week or so of our project on create our Google Slide, as well as making a physical model of our entire classroom, our tables, and a 3D model of our classroom and table coming together. (Credits to Tyler Colenbrander, who came up with the idea) Here is our presentation and YouTube videos of our model:
Part Four: Planning and Presenting- After all of this, we had begun planning our actual outdoor classroom using all of the information we had gained from our previous labs, activities, and steps 1-3 above, and it was not as hard as we had expected, but it still posed some challenges for us. The first thing we did was plan what we wanted our classroom seating to look like, meaning what the tables were going to be made out of, should we make the seats actual chairs or keep them as stumps, and whether we should keep our tables in one place or not, and then to make blueprints of the tables and the seating orientation,. We ultimately decided on making our tables almost exactly like the ones we have at school, but with a plexiglass top instead of the material that we currently use, because the school's tables had too much weight for us to move them around. We found a way for us to get the stumps from TreeMasters, and Kendal managed to acquire green and gold paint for us to cover the tops of our seats in, for school spirit, and the best part was that all 32 of the stumps came without any fees for us to worry about. After we had managed the group-style layout of the tables and the stumps, we focused our attention more onto how we were going to deal with the solar angles, what trees would make our outdoor classroom aesthetically pleasing and serve the function of making a privacy screen, and what sort of shade structure we would want to use. Through a lot of consultation and hard work, we found out what sort of privacy trees that we wanted, we made blueprints showing how far apart they would be placed, and we also came up with our initial idea on how to make our shade structure. This component of the outdoor classroom was much harder than everything else, and it ultimately took us around two weeks to finalize our four-tarp, retractable shade structure with a pulley system, and I think that this idea was the fourth one we had for our shade structure. Up next was figuring out the minor features, such as the whiteboard, which we ended up planning to get from Staples, and the material and amount of ground covering that we would need to cover our classroom floor, as well as the amount of concrete we would need to hold the posts of our shade structure. Our penultimate step in planning this out was creating our materials list, which contained everything from the price per unit of each material, how much of it we were planning on getting, and what website we found the materials on. Here is the link to our materials list: http://tinyurl.com/StemMaterialsList. With all of our schematics sketched, and our ideas finalized, we spent the last week or so of our project on create our Google Slide, as well as making a physical model of our entire classroom, our tables, and a 3D model of our classroom and table coming together. (Credits to Tyler Colenbrander, who came up with the idea) Here is our presentation and YouTube videos of our model:
|
|
|
|
Wind Turbine Lab and Alternative Energy:
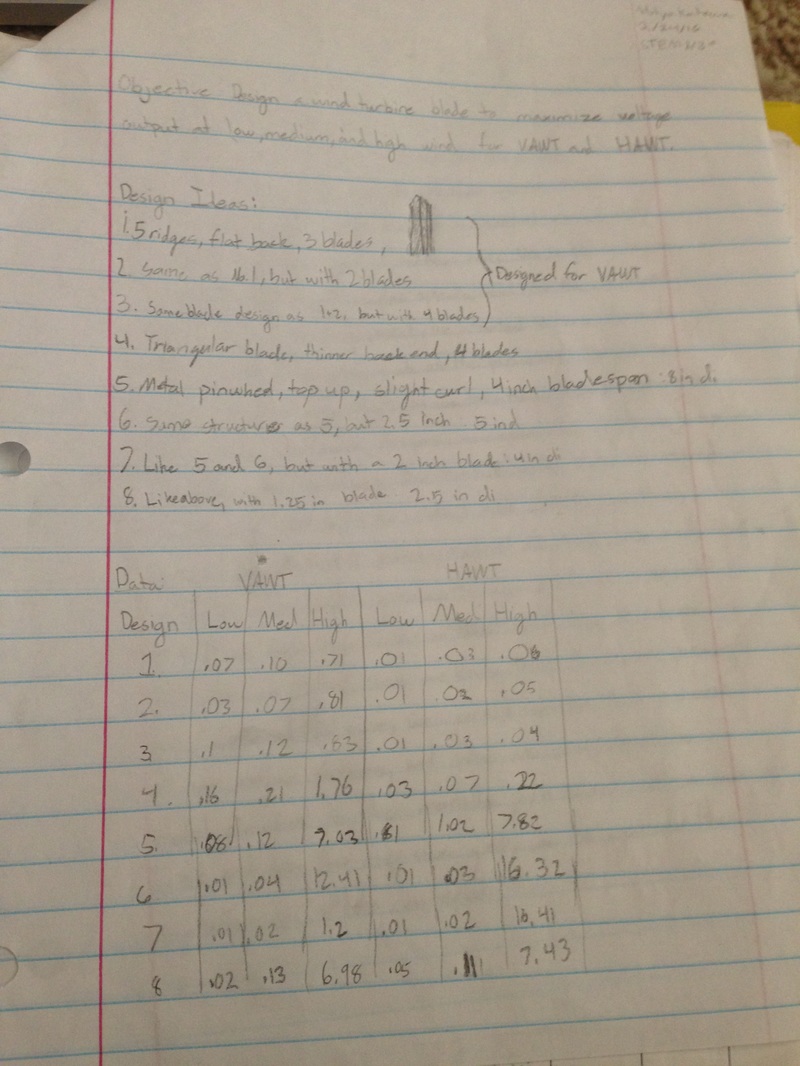
As we drew closer to the end of this project, we conducted a 4-day long lab in which we learned about how wind power is used to generate energy, what the pros and cons of each type are, why some forms of wind turbine blades are more effective on horizontal axes and why some are better suited for vertical axes. At the beginning, I was not sure how this tied into our outdoor classroom project, but I realized that the reason we are doing this is to find ways to generate electricity for our outdoor classroom without having a series running from our classroom to a main generator at the school. The procedure of this lab was fairly simple: design wind turbine blades that can generate the greatest amount of volts on either the HAWT or the VAWT (Horizontal Axis Wind Turbine and Vertical Axis Wind Turbine) using the materials that we had inside our classroom, including manilla folders, metal sheets, and dowel rods. We went through multiple designs, ranging from triangular manilla blades that generated a lot of force, but not enough velocity, all the way to a metal pinwheel that spun so fast that it generated enough lift to pull the motor out of its socket on the vertical axis. After gathering the data of three different wind speeds, with Low and Medium being a small box fan and High being a leaf blower, we used it to make a claim-evidence-reasoning poster and write a CLEAR paragraph. As for the alternative energy portion, each group was assigned a certain form of energy generation, and had to find out how it generated energy, what were the costs of that particular form, what were the benefits, why we actually need alternative forms of energy, and how much each type was used currently in the U.S. Our group was assigned coal as well as natural gases, and the entire assignment took two days to complete; one day was used to research our particular form of energy, and the other day was used to present our findings to the rest of the class. Here is the alternative energy document: http://tinyurl.com/STEMaltenergy |
|
Physics Concepts:
Atomic State- Depends on the energy of the atoms, can be solid, with the least energy, liquid, with enough energy to let the atoms move a bit more freely, and gaseous, which have enough energy to completely break the bonds.
Pressure- The amount of force exerted over a unit of area, calculated by P=Force/Area.
Density- The amount of mass in a certain space, calculated by D=Mass/Volume.
Volume- The amount of space that is contained within an object or how much space it takes up, calculated by 4/3 x pi x radius^3 or height x width x length.
Proton- A subatomic particle composing the nucleus of the atom with the neutron, and it has a positive charge.
Neutron- A subatomic particle composing the nucleus of the atom with the proton, and it has a neutral charge.
Electron- A subatomic particle located outside of the nucleus, and it has a negative charge.
Ion- An atom with an amount of electrons that are not proportional to the amount of protons it contains.
Molecule- Two or more atoms bonded together (usually through shared electrons).
Conduction- Heat transfer through solids, with varying levels of efficiency depending on the material.
Convection- Movement of heat through a fluid, mainly comprising of liquids and gases.
Radiation- Transfer of heat through waves, rays, or particles, and no medium is required to transfer heat in this method.
Lumen- The measure of the total quantity of visible light emitted by a certain source.
Calorie- The amount of heat required to raise one gram or milliliter of water by 1 degree Celsius (or about 4.186 Joules)
0th Law of Thermodynamics- If two systems are in thermal equilibrium with a third system, then they are in equilibrium with each other: if A=B, and C=B, then A=C.
1st Law of Thermodynamics- Energy is neither created nor destroyed, but transferred from one from to another; heat is a form of energy.
2nd Law of Thermodynamics- Entropy always increases; Entropy is a measure of disorder, or for heat, over time, everything becomes the same temperature.
3rd Law of Thermodynamics- Temperature can never reach absolute zero, meaning that heat will ALWAYS exist, and at absolute zero, all molecules and atoms stop vibrating.
Volts- The unit of electric potential, or basically the amount of energy that could be released if the electric current was allowed to flow.
Reflection:
First, of all, I congratulate everyone who's made it this far into my website update. It's been about as long as the outdoor classroom project itself. For this project, I don't think that I could have gotten a better group, because we all did what we were supposed to, no one let anyone else down, and if anyone was ever absent, then the other three would pick up the slack and we would keep on working. Even Kendal, who'd been injured during the project, came back and immediately picked up where she left off before the break, and Casey, who had missed our first few presentation days, had completely aced her part in the final presentation even though my computer wasn't really helpful. Justin kept everyone on track, always kept the group's morale up, and he also adapted to every minor setback we had and was the most consistent worker in our group, and Rachel also did a lot at the beginning of our project, even though she defected to the other group later in the project. It's really hard for me to pick out any pits that we had in our project, but if I had to find two, I would say that the first one was when we lost one of our group members, and that slowed down our group's efficiency just a bit. Our second possible pit would be the fact that we put a lot of people in danger during the Wind Turbine Lab, when we designed a metal pinwheel that generated enough lift to pull the motor out of the stand it was fixed in, but apart from that, we didn't have issues with time, communication, or any of our work in general. As for what I could have done better, I think the primary thing was not put my fingers right in front of the chop saw, when we had to cut down the dowel rods for our physical model. Another thing that I could have done better would have probably been my focus during the end of the project, because I got a bit too complacent and I spent most of my time in the final week talking with people in the other groups, and I let my teammates down a bit when I let them pick up my slack. As for a few things I've learned during the course of this project, one of the new skills I realized I have is the awesome aptitude for origami, especially folding metal without creasing the sheet and making nice, straight edges. I also learned that I can animate objects in 3DS Max pretty well and create animated scenes without too much of a problem, and thanks to Tyler's help, I also figured out how to render the scenes and upload them to YouTube. (I'm not that computer savvy.) Overall, my group was probably the best group I could ever have asked for with such a long and rigorous project such as this, and I'm not sure I'll get a better team than this for another project.
